fabian s. klinke
Designing and Implementing an Audio Batch Processing and Analysis Software to Aid Professional Mixing Engineers
Bachelor’s Thesis (B.A.), SRH Berlin School of Popular Arts (SoPA). Submitted September 8, 2022.
Abstract
Lippo is a standalone audio analysis and batch processing tool designed to streamline the preparation of large sets of audio files before they are imported and used in the engineer’s or producer’s digital audio workstation (DAW). This paper describes the initial problem the tool aims to solve, discusses user experience and design concepts, and details the algorithms and software architecture it deploys.
Introduction
Audio engineers and, more specifically, in the context of this paper, mixing engineers, receive many files from clients on an almost daily basis. This exchange of files happens in different ways, ranging from exchanging already prepared Pro Tools sessions to sending a folder with separate audio files for each channel or instrument. In the latter case, the engineer first has to import the files into their DAW and organize them in a way that makes sense for the project and their workflow before being able to start the actual mixing process. This process can be very time consuming and tedious, especially if the client sends a large number of files. This is where Lippo comes in, a software that aims to help audio engineers be more productive when importing and organizing large sets of files.
This project’s basic idea and inspiration stem from personal experience as an engineer working with mainly semi-professional and hobbyist producers and artists. When working with these clients, we cannot expect them to be familiar with all the ins and outs of the audio production domain; for many, it is their first time working with an external engineer.
Most of the time, the files that are sent were recorded in a home studio or produced electronically in some DAW of their choice and then exported as they are without too much thought put into the organization and naming of the files, as well as standard channel layouts for specific types of audio sources, e.g. raw vocal recordings being mono files.
Stemming from a passion for cleaning up and organizing systems and automating everyday workflows, I decided to create software that would help me and other engineers be more productive when working with these files. This software not only strives to make the process of importing and organizing files easier but also to help the engineer get a better overview of the project and the files sent to them even before listening to them. The following paper discusses the design process and implementation of the first prototype of this tool.
Analysis of the Initial Problem
When working with clients and creating many different projects from only a folder of exported audio files, the need arises to organise these files and prepare them for the actual work. This process can become rather time-consuming and involves much manual work. In the following section, we will discuss the exact problems that occur within these types of audio files in detail, as well as discuss the available tools that are currently used to solve these problems.
So how can we define what makes a clean set of audio files to begin with? According to the dictionary, clean is a term used to describe something that is “free from dirt” and can be “characterised by clarity and precision.” (Webster, 2022) So how can we translate this term to a set of audio files?
The first step in cleaning up something is to reduce the amount of unneeded information and data, the dirt. This entails removing unnecessary audio channel data and metadata for an audio file.
So primarily, we will focus on removing the dirt from the audio files, beginning with not needed audio material. Unnecessary audio channel data in the context of audio mixing is data that does not provide any valuable or critical information for the resulting mix. For example, if we have a stereo file with two identical channels, we can remove the second channel. The fewer channels we have, the less data we need to process, which in turn decreases the overall load on the CPU when working in a DAW, as well as the required disk space.
However, not all stereo files containing mono sources are truly mono, meaning they only appear to be mono when listened to, but the two channels do not fully correlate (for details, see the “Stereo Image Analysis and Reverse Panning” section). For example, we can get a bass drum track based on a mono sample that was distorted in such a way that the applied effect applied slightly different, but inaudible, non-linearities to both the left and right channels. These files hence can as well easily be converted to mono since the added channel does not add any valuable or important information to the sound.
Additionally, there sometimes are audio files which contain no audible signal. These need to be filtered out and the user made aware of them. These files can either be empty because a track has been accidentally muted or a return track with effects has been forgotten. When the engineer can detect these early, he can ask the client if these were intentional or not.
In standard PCM-encoded audio files, the only actual metadata that we have is the name of the file itself. Names are complex to clean up fully autonomously, so we can offer the user a powerful and flexible way of renaming the files to a more meaningful name (see the “Rule Based Batch Renaming” section). Nevertheless, before that, we can clean up some clutter in the names by removing unnecessary information. However, how can we determine what is unnecessary in a file name?
The most common set of files Lippo is designed to process is a set of multi-track audio files exported from a digital audio workstation. Most of these export the files in some way or another in the following pattern:
<project name> <track name>.WAV
It is safe to assume that all information that is repeated in every single file name does not provide any additional value to the reader of that name. We can remove the project name and any other patterns that repeat over all names. This dramatically increases the readability of the file names since it reduces the visual noise.
Last but not least, sometimes there are sets of audio files with different audio formats than the user might want or requires them to be in, or even sets containing files in multiple audio formats. For this, we can deploy an automatic high-quality SRC algorithm (see the “Comparison of Various SRC Algorithms and Choosing One” section) as well as bit rate conversion.
Many engineers will know these problems or at least a subset of them from their own day-to-day work with clients and will have spent some amount of time fixing these. There, of course, always exists the possibility of ignoring these issues or requiring the client to solve them, yet this only leads to lowered satisfaction on both ends.
Available Tools and Workflows
Most of these problems described can already be solved in some way or another. There are multiple tools out there on the market that can help us to solve individual issues such as mono conversion or renaming. In the following section, we will have a look at some of these tools and discuss their workflows, features and shortcomings.
StereoMonoIzer
StereoMonoIzer is a tool developed by Blake Eiseman and Michael Heiler under the company name Soundizers. At the core of the tool is a “custom-built algorithm that analyses audio files and determines their stereo content” (Eiseman & Heiler, 2015). This algorithm is able to determine whether a stereo file contains a mono signal or not. If it does, it will automatically be converted to mono by removing the channel with the lower overall amplitude.
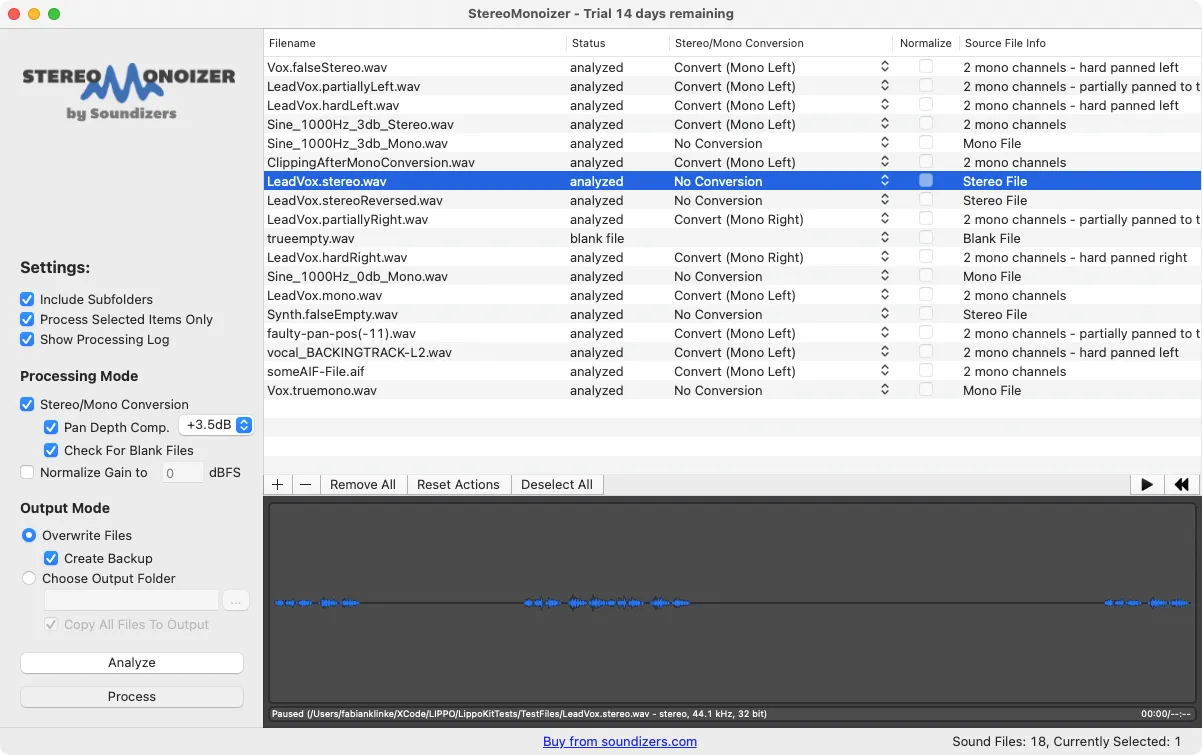
One of its most interesting features, however, is a “waveform viewer that displays the stereo content of your audio files. Most waveform viewers show a mono file as a single waveform and a stereo file as two waveforms to indicate two channels, [while] the waveform viewer in StereoMonoizer always shows a single waveform. But you can immediately tell if a sound is mono or stereo by looking for areas highlighted in blue” (Eiseman & Heiler, 2015) (see the “Screenshot of the StereoMonoIzer with a set of test files from Lippo” figure).
Since StereoMonoIzer is very clear in what it does and limits its use case to only stereo image analysis and mono conversion, its interface is self-explanatory and easy to use. However, the design language of the application has not been updated in a few years and looks outdated from within the updated macOS versions (beginning from MacOS 11 Big Sur).
Its biggest drawback is also one of its biggest strengths. StereoMonoIzer is a straightforward tool, but it is not very powerful. It is able to correctly determine the stereo content of a stereo file and convert it to mono, but it is agnostic to the format of the file and not able to convert it.
Batch Renaming from within Finder
Finder is the default file browser on Mac OS X, and while its basic purpose is managing the user’s file system, it comes with some primary batch renaming (Inc., 2022).
There are three renaming modes: Replace Text, Add Text and Format. The Replace Text mode replaces all occurrences of a text in a file with another text (see the “Screenshot of the Batch Renaming from within Finder with a set of test files from Lippo” figure). The Add Text mode adds text to the end or beginning of a name.
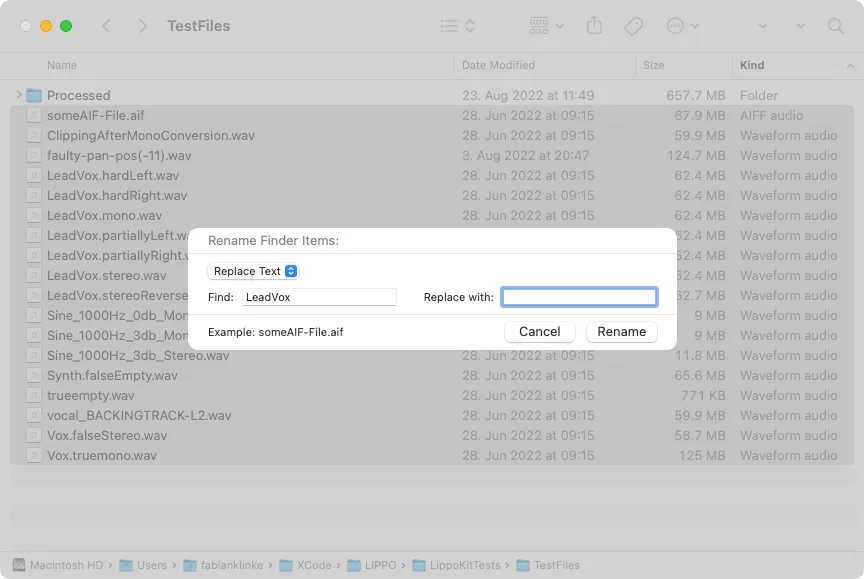
The Format mode allows us to name the files after a specific template. These templates consist of a new base name every file receives and a counter for every file. This leads to all files having the same name with different numbering. The last rule especially is not particularly useful for our purpose of cleaning up the file names since it instead increases the obfuscation of the file names by removing any initially still remaining information provided by the original file name.
Another disadvantage of the renaming features from within Finder is the lack of a preview of the resulting file names. When renaming a large number of files, it is hard to keep track of and imagine how the operation will affect all the files.
Furthermore, it is limited to only one renaming operation at a time; building a large and complex set of rules and observing the resulting file names is not possible. Through this, the renaming of a large number of files can take longer than it could.
To sum up, Finder is able to handle basic and simple renaming needs but is not able to handle more complex operations. Some of its features do not help to clean up the names of the files but rather obfuscate their original meaning by adding additional noise.
Batch Renaming from within Pro Tools
Pro Tools is a powerful audio editing and mixing software owned by Avid. Its primary focus is recording, editing and mixing audio for music and film. It also includes some tools designed to increase the engineer’s productivity when importing and organising large sets of audio files, including the ability to rename files in batch.
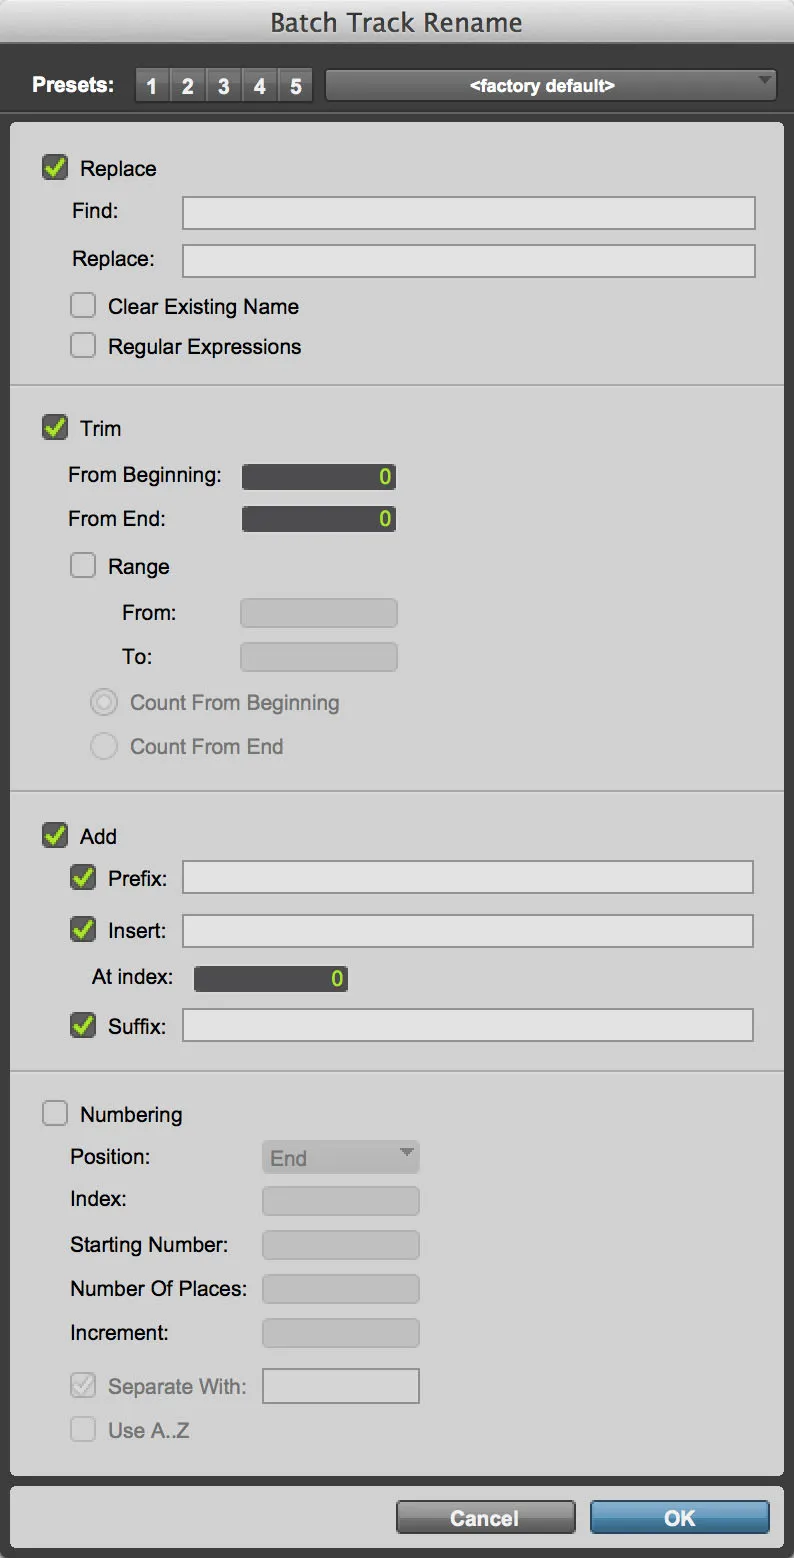
The renaming feature of Pro Tools is compelling and flexible. It allows you to build complex operations that are executed on all files at once (see the figure below) (Avid Technology, 2021). It offers at its core similar functionality as the Finder renaming feature but with more fine-grained control, such as the Add and Numbering modes. This, combined with the support of RegEx, comes together as a quite comprehensive tool which is able to handle most common and more advanced renaming needs.
The biggest drawback, as well as in Finder, is the missing preview of the resulting file names, which makes it hard to keep track of the operation. Its most significant advantage is that it is directly integrated into the DAW and does not need additional tools, but this feature is only available to Pro Tools users.
The biggest advantage, of course, is that the user is already working inside a fully-fledged DAW which automatically converts file formats on importing and can convert stereo files to mono. However, the latter has to be done manually by first listening and analysing the files and then splitting the stereo track into two mono tracks, which need to be appropriately gained.
What Problem Does Lippo Aim to Solve?
So what is the goal of Lippo in the face of their already existing multiple tools and possible workflows in this area? In what ways will it be different from the others, and what additional value will it provide to the users?
The biggest problem with the current options is that none provides a comprehensive and fully featured set of tools and workflows for audio professionals trying to clean things up. While every task can be handled in some way or another by using some tool, the scattered nature of the current state of the art makes it difficult to set up a time-efficient workflow that supports the engineer’s productivity. The main goal of Lippo is to unify these workflows and reduce the number of tools needed. Less is more; this also applies to steps in one workflow.
By integrating all the cleaning-up processing into one tool, we can create a different mindset and context for the user, in which they only think of organising files. Moreover, while we not only want to help the user by using fewer tools, we aim even to reduce the time spent inside of this one tool by handling or at least offering to handle a lot of the tasks automatically and provide the user with helpful information and suggestions so they can confidently sort through their files without the need to listen to them. We will discuss how we can achieve this through thoughtful design in the “Designing UI and UX” section.
Planning and Prototyping
An essential part of the software development process is not only the actual implementation but also the planning of what needs to be implemented and how. This not only touches on the details of the algorithms and software architecture deployed but, more importantly, the UX and UI design. The customer of any software product is not the programmer but the user at the other end; the user needs to be at the centre of every decision.
In the following, we will discuss what features are essential and hence will be part of the MVP (the “Features of MVP” section) as well as how to organise and lay them out in a way that is easy to understand and supports the primary goal of making the work of engineers easier. We also will discuss the paradigms and driving motivators behind the UI design (the “Designing UI and UX” section). Furthermore, we will go through the process of choosing a toolset and frameworks (the “Choosing Frameworks and Tools” section) with which to implement as well as discuss strategies for prototyping some algorithms and testing the final implementation (the “Methods for Prototyping and Testing” section).
Features of MVP
“A MVP is a development technique in which a new product or website is developed with sufficient features to satisfy early adopters.” The main characteristics of such a product are that “it has enough value that people are willing to use it … initially” while demonstrating “enough future benefit to retain early adopters”. It also acts as the basis for a “feedback loop to guide future development” (Becker, 2020).
Such an MVP hence needs to implement an essential feature set to demonstrate the tool’s general usefulness within an engineer’s toolset. To decide what those components are, we have to weigh their potential use against the predicted development effort and complexity.
As discussed in the introduction and the analysis of the problems we want to solve, the two main goals are automatic mono conversion and extensive batch renaming. The MVP will build on these two ideas and implement features surrounding these two stated goals.
To get a comprehensive overview of the stereo image properties of a stereo file, we first need to analyse it thoroughly. For the user and Lippo to make an informed decision on when to convert a stereo file to mono, we need different data points. The first is whether or not the stereo files contain a true mono signal and, if it does, where it is panned to. The second is to know how stereo all the remaining true stereo files are, so we can make an informed decision if it makes sense also to convert them to mono.
Since we have such a large amount of data about the properties of a stereo file, we will not only strive to implement a basic summing as a tool for converting stereo files to mono but aim to provide a more precise way of converting stereo files to mono regarding the gain compensation we apply by taking the calculated pan position into account.
Another stated goal is not only to automate the mono conversion of stereo files containing mono signals but also to give the user an extensive and customisable toolset to rename all the audio files in a batch. An approach seen in various other tools is a rule-based approach, where the user can define a rule that is then applied to all the files. This approach is easy to understand and can be extended by allowing the user to define multiple rules that are applied in a specific order. This approach is also very flexible and can be used to rename files in a way that is very specific to the user’s needs.
We now only have to decide which rules we need to be able to provide a holistic set of renaming operations. The first and most fundamental rule would be a simple find and replace operation, where the user specifies a search string and a replacement string. This is a straightforward rule that already handles most cases, including the removal of unwanted characters.
The other two of the more basic rules are Trim and Add. The trim rule can be used to remove an arbitrary amount of characters from the beginning or end of a string. The Add rule can be used to add some string to any position in the name counted from the beginning or the end.
Additionally, we want to lift the burden from the user by providing some form or another of automatically cleaning up some parts of the file names. The first we can implement of these is the removal of repeating patterns of characters such as the project names or other remnants of the export process (see the “Rule Based Batch Renaming” section for more details).
Another intriguing approach would be to utilise machine learning to detect whether a file is named appropriately, judging by its audio content. For this, we could train a neural network on a large set of files and their respective names and then use it to predict the name of a file based on its audio content. This would be an exciting approach but would require a lot of time and effort to implement and train the network. This is why we will not implement this feature in the MVP but rather leave it as a possible future extension.
Most of the time, the user only needs to implement a few rules to satisfy the most common renaming needs. However, to give the user full power over the renaming process, providing some form or another of RegEx is a good idea. A RegEx is “an expression that describes a set of strings [..] or a set of ordered pairs of strings” (Mitkov, 2004). They not only allow for finding and replacing simple character sequences but also for finding and replacing complex patterns, which can capture substrings that can be reused in the replacement string.
Most of the time, all the files in a directory will be in the same file format. In this case, it is not necessary to implement an automated format conversion. Nevertheless, sometimes, the client sends the files in a different format than asked for or through multiple exports, even just one or more files within the directory in the wrong format. In these cases, it is necessary to implement a format conversion operation that automatically converts sample rate and bit rate to the desired setting when they differ from it. While this is not the most critical, it is yet another step in unifying many operations and separate workflows into one unified entity.
While many other possible feature ideas fit into the application, these are the most vital ones for our MVP; they fully replace some of the existing workflows in other tools and, through that, offer enough additional value for potential users to be interested.
Designing UI and UX
According to Dieter Rams, good design makes a product useful and understandable but involves as little design as possible (Rules 2, 4 and 10 of (de Jong, 2021)). Translating these to creating the UI means that the user interface should be as simple as achievable and intuitive. Yet what does it mean for something to be simple, and how can we achieve such simplicity?
For this, we can have a look at the first three and most important rules for simplicity as described by John Meada in The Laws of Simplicity. Here he tells us that “the simplest way to achieve simplicity is through thoughtful reduction” (Law 1 of (Maeda, 2020)). This process of reduction is a constant in the design process, starting with the first iterations of UI sketches and ending with the source code in the final implementation.
When everything that can be removed is removed, we can further reduce by shrinking, or hiding (Maeda, 2020) functionality, so the user only notices them when they need them. The primary way of doing this is to hide a more advanced feature or setting behind a menu item or to disable features on the UI when they cannot be used.
![Screenshot of CleanMyMac [@inc2022af]](/_astro/clean_my_mac.DspoFqd6_ZnLYAA.webp)
Striving for the tenth rule of good design by Rams, “Good design is as little design as possible”, is another way of thoughtful reduction. “Less design is more; after all, it concentrates on the essentials instead of cluttering the products with superfluous items. Back to the pure, the simple” (de Jong, 2021). When for example, looking at a screenshot of CleanMyMac (see the figure below), we notice very bold colour choices and UI elements that are overlapping outside of the window. While this leads to a visually interesting design, there is more going on visually than is needed for the user to understand the functionality. It even touches on breaking yet another rule of Rams: “Good design is long lasting” (de Jong, 2021), with which he wants to communicate that good design should be able to stand the test of time and not look visually outdated too quickly.
When avoiding breaking these two rules, we can try to build a UI that is as simple in its design language as possible without adding unnecessary colour choices and other striking elements. Further, we can aim to imitate or even connect the UI to that of the OS in which the application is running in such a way that the layout and the functionality of the UI will update automatically when the OS and with it the general design language of the platform changes. By keeping these two guiding approaches in mind, we can develop a design language that is adaptable, timeless and will not overbear the actual functionality of the tool itself. It is not the designer and the programmer at focus; it is helping the user to work more quickly.
The remaining elements that cannot be removed need to be structured such that they make sense to the user. “Organisation makes a system of many appear fewer.” (Law 2 of (Maeda, 2020)). So how can we organise the functionality in such a way that it is visually pleasing while helping the user to use them without being unable to find what they need in the context they need it in?
Separating the UI into different contexts can be a helpful guiding principle. This is done by sorting and grouping all the features that are either related to a particular context or stage in the workflow process. The main workflow processes of the software are importing, analysing and fine-tuning settings and exporting. Splitting the application into these three basic categories is a good start for organising functionality.
In the import process, we need to be able to open and evaluate all the files quickly and get an overview of what is there. Here we can show an overview of the files themselves, their formats and metadata, so the users are able to verify that all the files they want to be imported are.
The fine-tuning process needs more detail and is split across several categories, each of which is defined by a class of functionality: Stereo Imaging, Renaming and Levels. In each section, we show an overview of all the detailed analysis data and provide a way to edit the application’s behaviour.
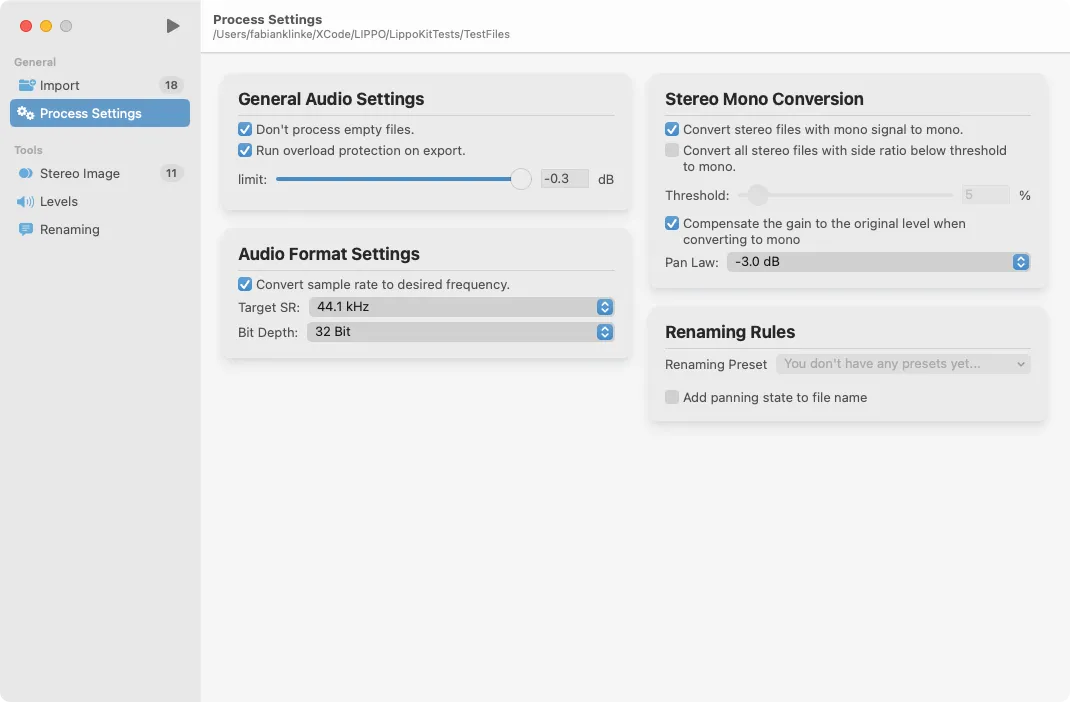
Lastly, in the exporting section, we provide features that affect the whole of the audio files, such as changing the sample rate or bit rate. These are further grouped together in smaller groups (see the “Screenshot of Lippo’s processing overview.” figure). The processing view is further built to work as a hub for adjusting the application’s behaviour more quickly.
A good UX not only happens through good UI design but also through the right feeling, according to Meada “savings in time feel like simplicity” (Law 3 of (Maeda, 2020)). With this maxim in mind, we always attempt to not only reduce the time a computation takes but also try to minimise the time the user spends within the application in general. Lippo is a tool that is designed to reduce the workload of engineers, not to increase it.
An example of this reduction in time spent is how we handle the conversion to mono. While the user can choose to convert stereo files to mono individually based on the analysis results, they can also use the settings in the processing view to tell Lippo which kinds of files to convert and hand over the decision to the application. This way, the user can focus on the more important tasks and let the application do the rest.
Another example of this approach is the implementation of renaming presets, with which the user can store his renaming rules and load them when needed. This way, the user can build up a library of renaming rules they can use in different projects and not have to re-enter them every time.
Intuitive design means that the user should be able to understand the application’s functionality without having to learn any technical details. To achieve this, we need to be thoughtful of the symbolism and organisational structures we use throughout the UI, so we can achieve some level of familiarity by borrowing from similar processes.
Regarding the iconography within, the app can use OS defaults to tie everything in with the platform and help the user understand each symbol. On Apple platforms, we have SF Symbols for this. “SF Symbols is a library of iconography designed to integrate seamlessly with San Francisco, the system font for Apple platforms” (Inc., 2022b). If there is no default symbol for what we need, we can then use a similar one that does not have a strong meaning in another context.
An example of this borrowing is the processing button in the top left corner of the app (see the “Screenshot of Lippo’s processing overview.” figure). This button is used to start the processing of the files. The play symbol is usually used to indicate that there is some multimedia content that can be listened to or watched. Every audio engineer is familiar with an icon that, on a higher level, always represents that something is going to start. Something which can be translated to another kind of process to start, in this case being the processing of the files.
These all are just guiding principles that are used when designing the GUI of Lippo. They will inform and influence our choices in the design process and help us to build a UI that is intuitive and easy to use.
Choosing Frameworks and Tools
Choosing the right frameworks and libraries is the foundation of the software development process. The right set of tools will allow us to create a high-quality, scalable and easily maintainable product. They define which features can be implemented in the future and what the app will look and feel like while also greatly influencing the development speed. In the following section, we will discuss the frameworks and toolsets we are using for the core of the application, the alternatives that are considered, and the reasoning behind the final choices.
Deployment Platform
The first decision we need to make is which platform we want to deploy the application on. This is important because it will influence the frameworks and libraries we can use.
According to Statcounter (Statcounter, 2022), the most popular operating system in the world is Windows. It is used by 74% of all users. This is followed by macOS with 14% and Linux with 3%. Judging by this statistic, it would be the most sensible choice to primarily target Windows. However, when looking at various unrepresentative polls on online platforms for music production, we find that the majority of audio professionals are using macOS, on average around two-thirds (Thornton, 2021) (Audio, 2019).
Since we want to, as discussed in the “Designing UI and UX” section, provide a native feeling to the application with the stated goal of making the application feel at home in its chosen target platform, it is easier to target only one and focus on integrating it on that platform the best we can, instead of trying to target all platforms with a mediocre application.
Additionally, we need to ask ourselves the question of which version of the operating system we want to target since it will influence the versions of the SDKs we want to use. In the survey on Pro Tools Expert from January 2021 (Thornton, 2021), we find that the majority of users are using macOS Catalina (10.15) with 24% and Mojave (10.14) with 21%. The most recent operating system at that time was Big Sur, which was only released in November 2020, around two months before the survey. Since most professional users need to await fully verified compatibility of the software they use, it is fair to say that at the time of the survey, most of the respondents were using the latest or second latest version of macOS they are able to use professionally.
The most recent OS version of macOS is Monterey (12.0). According to Production Expert (Ltd., 2022), most software tools are by now verified and tested on this version, allowing audio engineers to update to the latest version safely. Furthermore, after the release of the new Apple Silicon based computers, which all come with macOS Monterey as the default, all engineers buying new machines will be forced to use this version.
Since Lippo is a productivity tool for audio professionals, we need to take these considerations into account when choosing the right version and platform while also keeping development speed and potential release dates in mind. Limiting ourselves to the latest version of macOS will, for now, also limit the potential user base. However, it will also allow us to use the latest SDKs and libraries for macOS.
This limitation, however, is not a deal breaker since, on the earliest possible release of the tool to the general public, Monterey will already be replaced by Ventura (13.0), which will further increase the user base even amongst the more conservative updaters.
SwiftUI vs Alternatives Considered
Choosing a UI framework for a desktop application not only limits us in what the software will look like but also limits the platforms it is able to run on. Several frameworks are available for the desktop platform, all with advantages and disadvantages. The four contenders are AppKit, SwiftUI, and Elektron-based web apps. In the following, we will discuss all the frameworks and technologies we will consider for our application and how we can choose the best one for our use.
The first option we will consider is Electron (contributors, 2022). Electron is a framework which allows the developer to wrap a web app in a native application hosting this webview. This enables us to build an application with the same UI code on all platforms using HTML, CSS and JavaScript. This technology stack can be a great option for the modern web-based application that needs constant access to cloud infrastructure, primarily since there is not much additional development needed between browser and desktop versions.
However, this approach comes with a significant disadvantage: performance. Since electron utilises a full web browser that displays and loads the UI, there is much additional overhead. Furthermore, from a design perspective, it is tough to make an electron app “feel native” on any platform, meaning using similar design choices, idioms and paradigms as other applications and the platform it runs on.
Since performance and a native feeling are part of an intuitive and generally good design (see the “Designing UI and UX” section), an Electron-based toolchain is not going to be the best to achieve our goals.
AppKit (Inc., 2022a) is a GUI framework that is used in the macOS platform, which originated together with Objective-C at NeXT and was later combined with the Foundation framework to form the Cocoa environment (Foresman, 2012). Cocoa is still the most widely used toolset for building MacOS applications. One of its most distinctive add-ons is the Interface Builder within Xcode, which allows the developer to build up the UI of the application in a graphical environment.
SwiftUI is a modern declarative UI framework for all Apple platforms. It is built as a successor to UIKit, and AppKit (Inc., 2022d). It reduces a lot of the boilerplate code that is required when using AppKit. One of its main advantages is that it is a declarative framework, which means that the developer does not need to tell SwiftUI how to build the UI but tells it what the UI is supposed to look like. This, in turn, allows SwiftUI to render the same code on different platforms, e.g. macOS, iOS and watchOS.
It is by now the primary supported and developed framework by Apple. While some functionality is still unavailable to SwiftUI, its interoperability with AppKit allows access to these missing features. However, most of the UI elements needed are already provided by SwiftUI in Monterey, such as the Table view we need to display the list of audio files.
The combination of SwiftUI for all primary components with some AppKit sewed in for all features not yet available is the approach for modern Mac applications recommended by Apple, even if this stack means that we will not be able to support older versions of the OS for now.
JUCE vs AVFoundation
The most central part of the software is the audio processing. Choosing the right set of tools for handling all audio-related tasks is the basis of the application’s software design. There are various options to choose from, yet there are only two we will consider for our purpose.
“AVFoundation is [a] framework for working with time-based audiovisual media on iOS, macOS, watchOS and tvOS” (Inc., 2022b). Since we decided on using SwiftUI for our application frontend, AVFoundation is a natural choice for its easy-to-use Swift API. It combines various media tasks such as audio and video playback and recording into one framework while hiding a lot of the underlying complexities, making it very developer-friendly for simple tasks.
However, when low-level access to memory management and file I/O is needed, AVFoundation is not the best choice. First of all, when working with many large audio files, memory management can become an issue. Since AVFoundation is a high-level Swift library with automatic memory management and garbage collection, optimising for memory usage becomes non-trivial.
However, one of the main issues is limited access to lower-level format settings when exporting audio files. For example, setting the bit depth of an audio file to something other than 32-bit is not well documented. The API provided by AVFoundation does not work as one would assume: setting the bitrate to 24 bits, for example, does not change the resulting audio file.
All of this combined leads to AVFoundation being a viable option for many more basic audio tasks which generally occur in mobile apps. However, using it for more advanced audio processing leads to more workarounds than desirable.
“JUCE is an open-source, cross-platform C++ application framework for creating high-quality desktop and mobile applications, including … audio plug-ins and plug-in hosts. JUCE can be easily integrated with existing projects via CMake …” (J. contributors, 2022). It includes various classes for handling audio input/output, MIDI, synthesis, sequencing, and more.
Since JUCE is primarily a library for handling audio processing for professional audio applications, it offers a wide range of specific algorithms and features for this area, including more fine-grained control over file formats.
Furthermore, because it is implemented in C++, it naturally lends itself more to manual memory management, which helps us decrease the application’s memory footprint. We can, for example, better decide when to load a file into memory and when to release it, so the buffer is only loaded when it is needed: during the analysis and the processing.
Additionally, since most modern audio processing is done in C++, there exists a larger number of open-source libraries with which we can integrate when specific features are not provided by JUCE. For example the various SRC libraries discussed in the “Comparison of Various SRC Algorithms and Choosing One” section.
To summarise, JUCE is the better choice when compared to AVFoundation for our purposes. It allows us more control and opens up more possibilities for the future development of new features.
Methods for Prototyping and Testing
Before we can begin to implement our application, we need to develop and prototype the algorithms to verify if the intended features are in the realm of possibility. Furthermore, we need a way to verify the results of the prototype algorithms and to make sure that the results are logically and mathematically correct, as well as test their expected errors to make sure they are not too big for the app not to be used anymore. Additionally, we need a way to verify if the final implementation of the software works as expected and predicted by our initial tests and prototypes, as well as make sure that it does not stop working at some point during the development of other features.
According to Arnowitz et al. (Arnowitz et al., 2010), the entire process can be divided into four phases, each with its own sub-phases. The first is the planning phase, where we verify our requirements and determine the features that we need to implement. The second is the specification phase, where we determine characteristics and choose methods of prototyping as well as tools. The third is the design of the prototype in which we, for example, design our algorithm or build iterations of the UI. The fourth is the results phase, in which we review the design, validate and verify it against our requirements and deploy it.
This method is first of all applied on a global scale of this project and represented in the structure of this paper. However, it is also applied on a local scale, e.g. on a single feature or on a single algorithm as described in the sections of the implementation of each feature.
Prototyping and Testing Audio Algorithms in Matlab
“A prototype is any attempt to realise any aspect of software content” (Arnowitz et al., 2010). This can be a version of the entire software or just a single component from within. The focus of our prototyping in Matlab is on the audio algorithms.
There is a long way between the first inception of a wanted behaviour and the final implementation of the application. The first step for most audio analysis algorithms is identifying the math and logic involved in designing the feature.
However, before implementing it directly, we must verify if the design is feasible and provides the expected results. While it is possible to do this directly within the application and check with external tools afterwards, we will do most of our audio prototyping in Matlab. “MATLAB is a programming and numeric computing platform used by millions of engineers and scientists to analyse data, develop algorithms, and create models” (The MathWorks, 2022). It has an extensive algebraic and numerical computation toolbox and a robust data analysis and visualisation environment. Furthermore, it can be extended with additional tools such as the Audio Toolbox, which provides functionality tailored to analysing and handling audio signals (The MathWorks, 2022a).
Inside Matlab, we can then build our prototype from a more mathematical point of view, with Matlab also verifying our algebraic solutions. We then can test these solutions with generated test signals and visualise the results to make sure that the results are correct.
Furthermore, we can use Matlab to generate test signals with which we can perform manual tests of the final implementation of the algorithms and then inspect these in detail. This is especially useful for the SRC conversion, where we can generate test signals with different sample rates and verify if the results are as expected (see the “Comparison of Various SRC Algorithms and Choosing One” section).
What Are Automated Tests?
However, we not only want to manually test our application before every release since this can become rather time-consuming. For this, we can deploy a set of automated tests, meaning tests that are run automatically by a computer program. These tests can be classified into two categories: unit tests and integration tests.
“A unit test is an automated test that verifies a small piece of code (also known as a unit, does it quickly and does it in an isolated manner” (Khorikov, 2020). The last part of this definition, the isolated nature, is disputed in what it entails exactly, which gave birth to two different schools of thought on unit testing: The London School and the Classical School. “The difference between the [two] is the isolation attribute. The London school views it as isolation of the system under test from its collaborators, whereas the classical school views it as isolation of unit tests themselves from each other” (Khorikov, 2020).
This means, for the London school, that every class has its own set of unit tests. All dependencies to outside classes and objects are replaced by test doubles. This granular approach makes it easier to debug and test individual failures since we can be sure that the class under test is causing it.
On the other hand, the classical approach focuses more on isolating the tests from each other instead of other classes. “Tests should not verify units of code. Instead, they should verify units of behaviour” (Khorikov, 2020). With this approach, we focus from the beginning on testing the behaviour of our code instead of testing the code itself. This subtle difference opens up a shift in mindset towards a focus on the behaviour of the software instead of aiming to fulfil a certain amount of unit tests blindly.
The focus on the isolation from other test cases also enables us to run these unit tests in parallel since we can be sure that they will not influence each other. This parallelisation leads to higher performance when running our tests.
Additionally to unit tests, Khorikov defines another type of test called the integration test. “An integration test … is any test that is not a unit test” (Khorikov, 2020). These tests usually focus on testing the system’s behaviour when it interacts with out-of-process components, such as a database, a web service, or a third-party service (Khorikov, 2020). Furthermore, they include tests that can only be performed when all the components of the final system are available as a whole, such as when all separate modules are integrated into a single application.
Stemming from the integration testing being every type of test that is not a unit test, a test that “verifies two or more units of behaviour” is also an integration test. Furthermore, they “can also verify how two or more modules … work together.” (Khorikov, 2020).
Automated Tests for Algorithms in C++
Our testing suite in the C++ module, which contains the audio processing code (see the “JUCE vs AVFoundation” section and the “General Software Architecture and Design” section), should be able to verify the correctness of the single algorithms and single mathematical operations in question.
A Unit test, in this sense, is a small and fast test that verifies a single unit of behaviour independently. The test is run in isolation and is not interdependent with other tests and external components. For this purpose, a collection of unit tests, as described in the “What Are Automated Tests?” section, come into question as a way to verify our program.
For example, we can test the correctness of our stereo analysis algorithm by using a test signal with a predefined pan position and verify if the calculated pan scalar is as expected. With this strategy, we can additionally test the average error of the algorithm and verify if it is within a certain threshold.
Automated Tests and Benchmarking of Application Processes in Swift
From within Swift, we can first of all focus on testing the behaviour of the entire application and the outcomes of the file analysis and processing. These tests fall into the category of integration tests since each of them tests multiple units of behaviour that are dependent on external components, the test files we use.
The primary goal of these kinds of tests is to avoid regressions of already verified behaviour during the development of future features. “A regression is when a feature stops working as intended after a certain event (usually, a code modification)” (Khorikov, 2020).
The strategy behind these tests is to use a set of existing test files we already analysed with external tools, from which we know the expected analysis results. We then use this set of test files to verify specific behaviours of the application, such as the correct analysis results or the appropriate processing of the files.
These tests are, as suggested by Khorikov, integrated into the development process. “The only point in having automated tests is if you constantly use them. All tests should be integrated into the development cycle. Ideally, you should execute them on every code change, even the smallest one” (Khorikov, 2020). To achieve this, we use the Xcode testing framework and some build automation tools to force the execution of the tests before every release of the application.
Additionally to testing the behaviour and results of the processing, we also want to be constantly aware of the application’s performance. For this, we can deploy a variety of performance tests. These tests usually run a single behaviour unit multiple times, measure the performance and calculate an average over these iterations.
We then can use this average and compare it to performance results of tests run on earlier versions and observe if the performance has improved or worsened. This allows us to identify new code changes that affect the performance drastically.
Implementation
After deciding on all the tools we want to use and designing and planning the workflow we want to provide the user with, we can start to implement the software. This first begins with thinking of an overall architecture that governs the structure of the code base and the main interactions between the different parts (see the “General Software Architecture and Design” section) and then goes on to implement the various individual features. Infrastructural code, as well as details on the implementation of the UI, will be omitted from this paper for brevity.
General Software Architecture and Design
Software architecture is commonly referred to as the “high level … structure” of a system while design as the “lower level details”. However, Robert C. Martin argues that these two cannot be discussed separately. “The low-level details and the high-level structure are all part of the same whole. They form a continuous fabric that defines the shape of the system” (Martin, 2018).
So what is the goal of good architecture? It “is to minimise the human resources required to build and maintain the required system” (Martin, 2018). This means that we want to structure our code in such a way that it is easy to understand by the developer while also making it easy to maintain. So changing one part of the software should not require us to rework another completely.
To achieve this on an overarching project scope, we can first of all separate the UI code from the logic and processing using a modular approach. So all the logic can be kept in a separate framework target called LippoKit. This framework is responsible for managing and executing all operations on the audio files, as well as handling additional tasks such as storing and loading settings and presets.
Since we decided to use JUCE for all the audio operations (see the “JUCE vs AVFoundation” section), we should separate this C++ code from the Swift codebase into a separate framework target called CLippoKit. However, Swift is not (yet) able to interact directly with C++ code, so we need to provide a C API through which Swift can interact with the C++ code.
This C API offers us a wrapped pointer to the C++ AudioFileHandler base class, as well as functions for executing the processing and analysis functions of the C++ code, while also providing some basic structs for communicating results and settings.
The central point of the architecture is the AudioSession class which handles and delegates all the tasks and processing applied to the collection of audio files. It also acts as a point of access for the UI to retrieve data and execute commands.
Since Lippo is a one-windowed application, meaning there is only one instance of the software running simultaneously, we only ever need one instance of the AudioSession class. We use a singleton design pattern to ensure this, which also allows for easier access without having to pass around pointers. A Singleton is a class that provides in its interface a static instance of itself (Gamma et al., 1995).
This single instance then provides access to multiple instances of the AudioFileHandler class which is responsible for all tasks that need to be performed on single audio files, e.g. the analysis and processing. The AudioFileHandler class also holds a reference to its corresponding instance of the C++ AudioFileHandler class, which does all the low-level audio analysis and processing. These two classes communicate through a procedural C API.
The UI code generally is structured into the main AppDelegate, which handles the main lifecycle of the application and the main view. This central view creates the sidebar layout and a navigation view responsible for navigating between the different subviews. Each subview observes the AudioSession class, updates itself accordingly, and triggers operations.
Stereo Image Analysis and Reverse Panning
To analyse the contents of a stereo file, we first need to understand how a mono signal becomes a stereo signal through panning. Generally, there are two different ways of achieving this. One is by utilising the Haas effect, a phenomenon in which a stereo signal’s left and right channels are identical but with a slight difference in phase. Since the human brain perceives the position of a sound source by the difference in the time the sound wave reaches the left and right ear, the Haas effect is a useful technique for performing this task. (Haas, 1972)
The other way is to use amplitude-based panning functions, where we leave the left and right channels in phase but change the amplitude of each channel. This is done by multiplying the left and right channels by a factor, which is determined by the angle between the source and the listener - usually represented by a pan position on the channel strip. (Tarr, 2018)
When panning a mono signal on the channel strip in a DAW or other audio workstation, amplitude-based panning is used since it does not lead to a phase shift. Because of this, Lippo only supports amplitude-based panning in its stereo analysis.
Algorithm for Stereo Image Analysis
If we want to find out if a stereo file contains a panned mono signal, we can use the knowledge from above that in amplitude-based panning, the phase of the left and right channels is identical or in other words that the left and right channels are identical except for their amplitude scalar.
To determine if the two channels correlate, we can use the Pearson Correlation Coefficient (Bivariate Correlation), which is a measure of the linear correlation between two sets of numbers. The value of the correlation coefficient is between -1 and 1, with a value of 1 indicating perfect correlation. For this, we can use the numerically stable implementation within the Boost C++ library (Schubert & Gertz, 2018) (Boost, 2022).
Once we know that the two channels correlate, we can use the summed channel amplitude to determine the pan position by reversing a chosen panning function.
Commonly DAWs use constant power panning, which is a function designed such that the combined power of the left and right channel is constant at every pan position. This is the default panning function in Lippo. Some engineers might prefer to use a linear panning function instead, a function designed such that the combined level of the two channels is constant. In some analogue mixing desks, an additional pan law is used, the -4.5 dB pan law, which combines the two panning functions above (Tarr, 2018). We must implement all the above techniques to give the user complete control.
To arrive at the reversed panning functions, we must solve them for the pan position. Since we know that the amplitude scalars of the left and right channels, and can be calculated as follows (Tarr, 2018):
where is the normalised pan position ranging from zero to one, with being the centre pan. We can use the above functions to calculate the pan scalar for two given amplitudes and . After equating this gives us for linear panning
and for constant power panning, the equation
Solving the -4.5 dB pan law is a bit more involved since we need to solve the equation numerically due to its transcendental nature (Hazewinkel, 1993). We can use Newton’s method (Süli & Mayers, 2003) to compute the pan position numerically. As the base function for Newton’s Method, we use the following function:
where and are the left and right channel amplitudes and and are the amplitude scalars of the left and right channels defined by the -4.5 dB pan law (see the equation above).
We then use Newton’s Method to solve for by iterating over the following equation times, where , until does not change anymore, with an initial guess of for L > R and for L < R:
This numeric solution is quite computationally expensive, so in Lippo, we use a LUT to speed up the calculation. This LUT holds 100 precomputed values for and . The amplitudes are scaled to the maximum between the two and act as the indices for the LUT.
Furthermore, we can calculate a Side Ratio which is a value that indicates the amplitude ratio between the side signal to the entire signal. It can be calculated as follows:
where and are the rectified summed side and mid signals, respectively.
This side ratio will then be used to determine how stereo a true stereo file is. It serves as a measure of how much of the audio data on both channels are decorrelated and guides users in their decision whether or not to sum a stereo file to mono.
Verifying the Algorithm and Calculating Error Margins
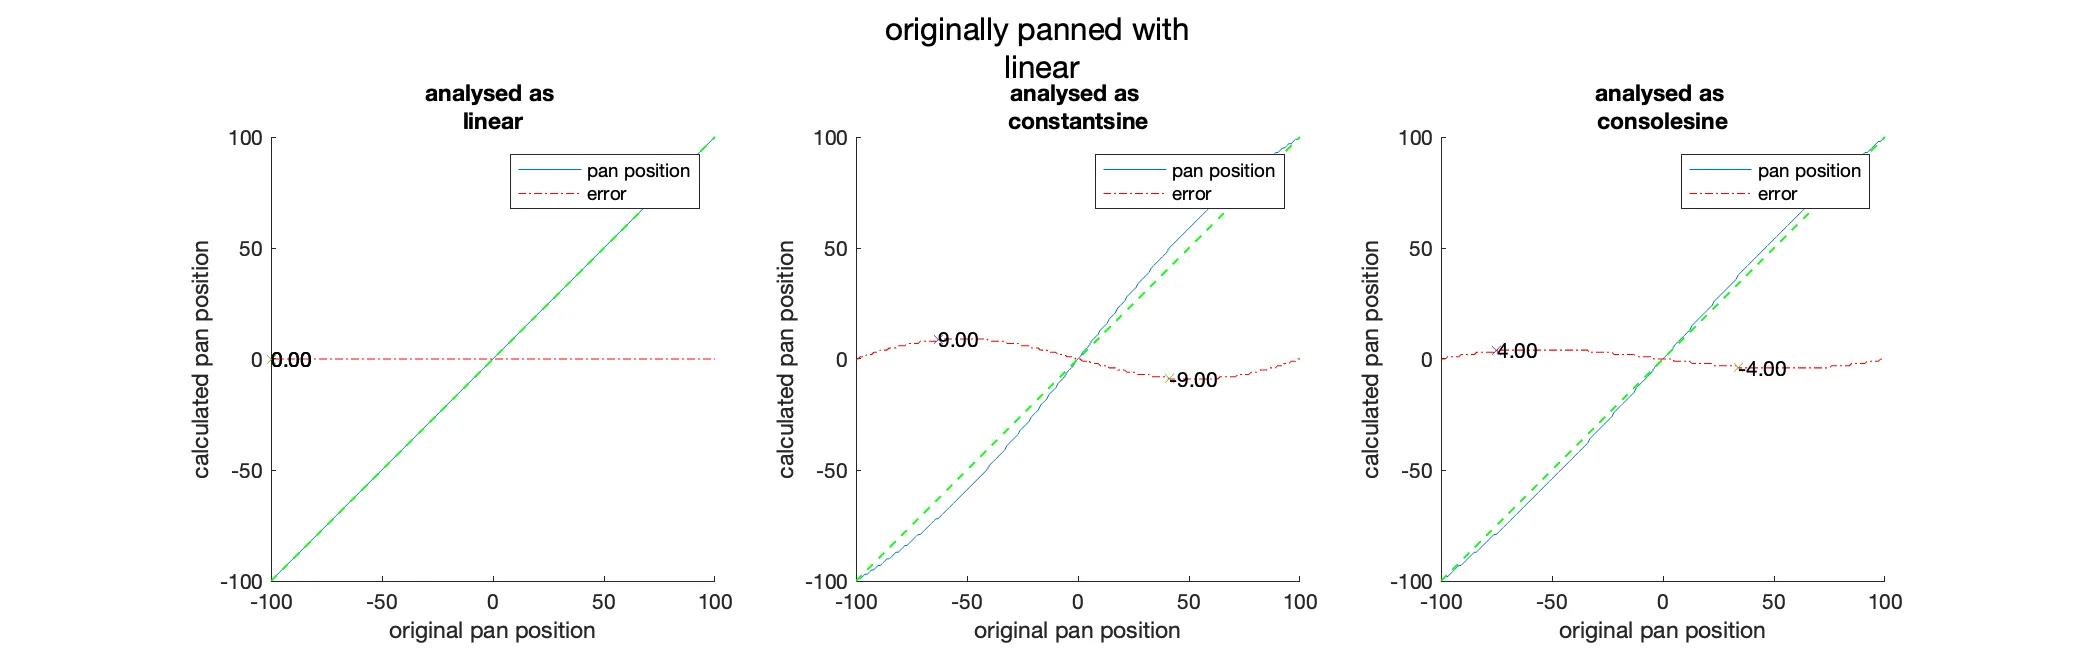
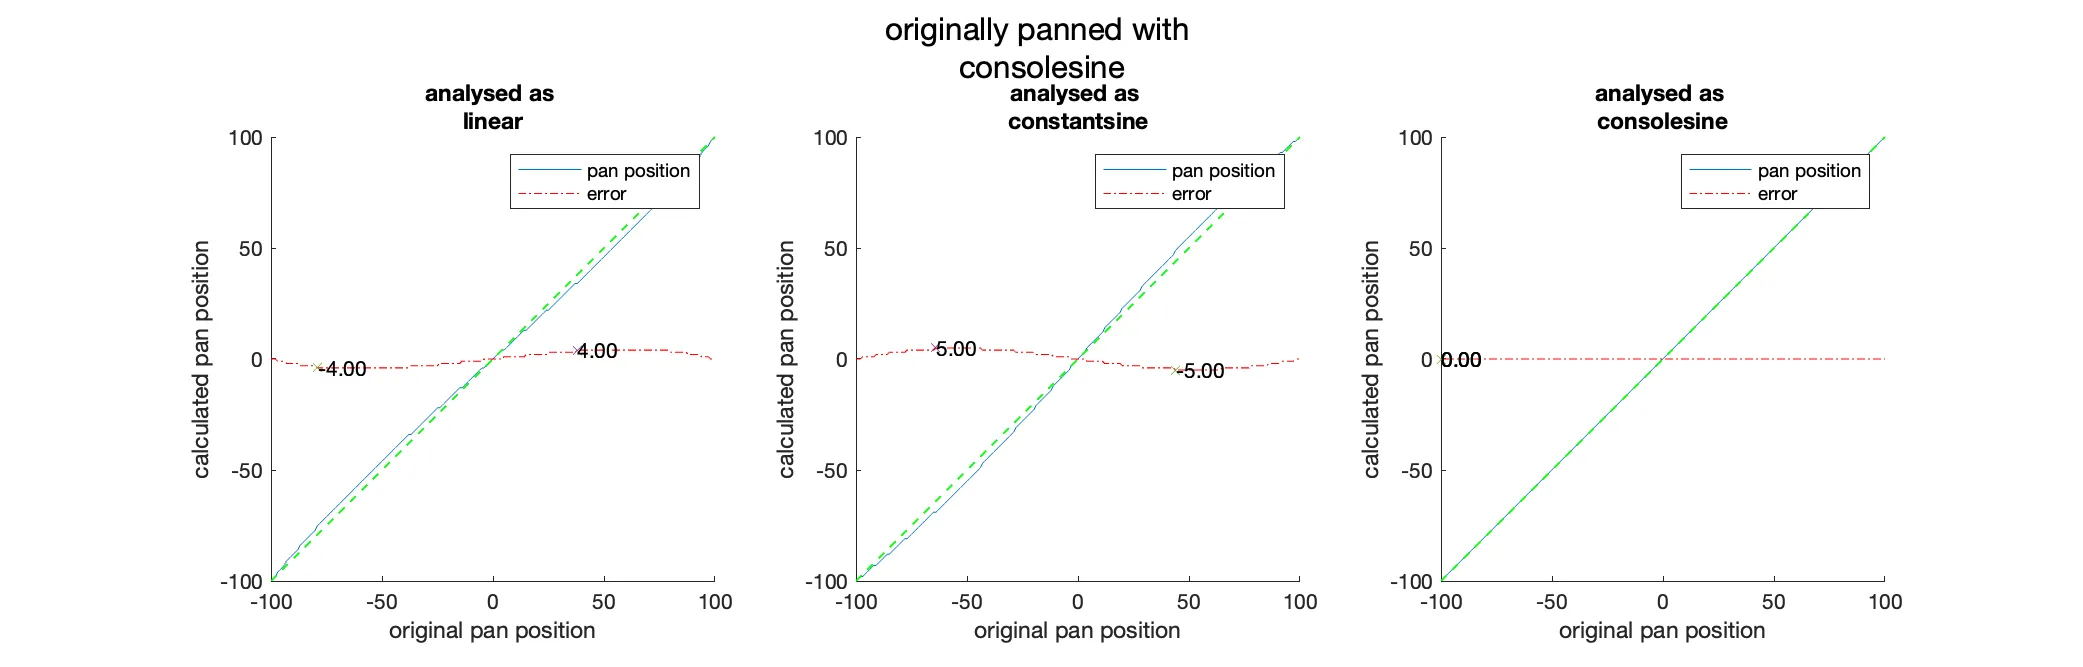
To verify the algorithm, we can use a generated test signal and pan it manually. We then can compare the result of the algorithm with the predefined pan position. To get a complete picture, we will test the algorithm with all pan scalars that would occur for a range of pan positions between -100 and 100 in increments of 1. These tests were performed with the prototype version of the algorithm within Matlab.
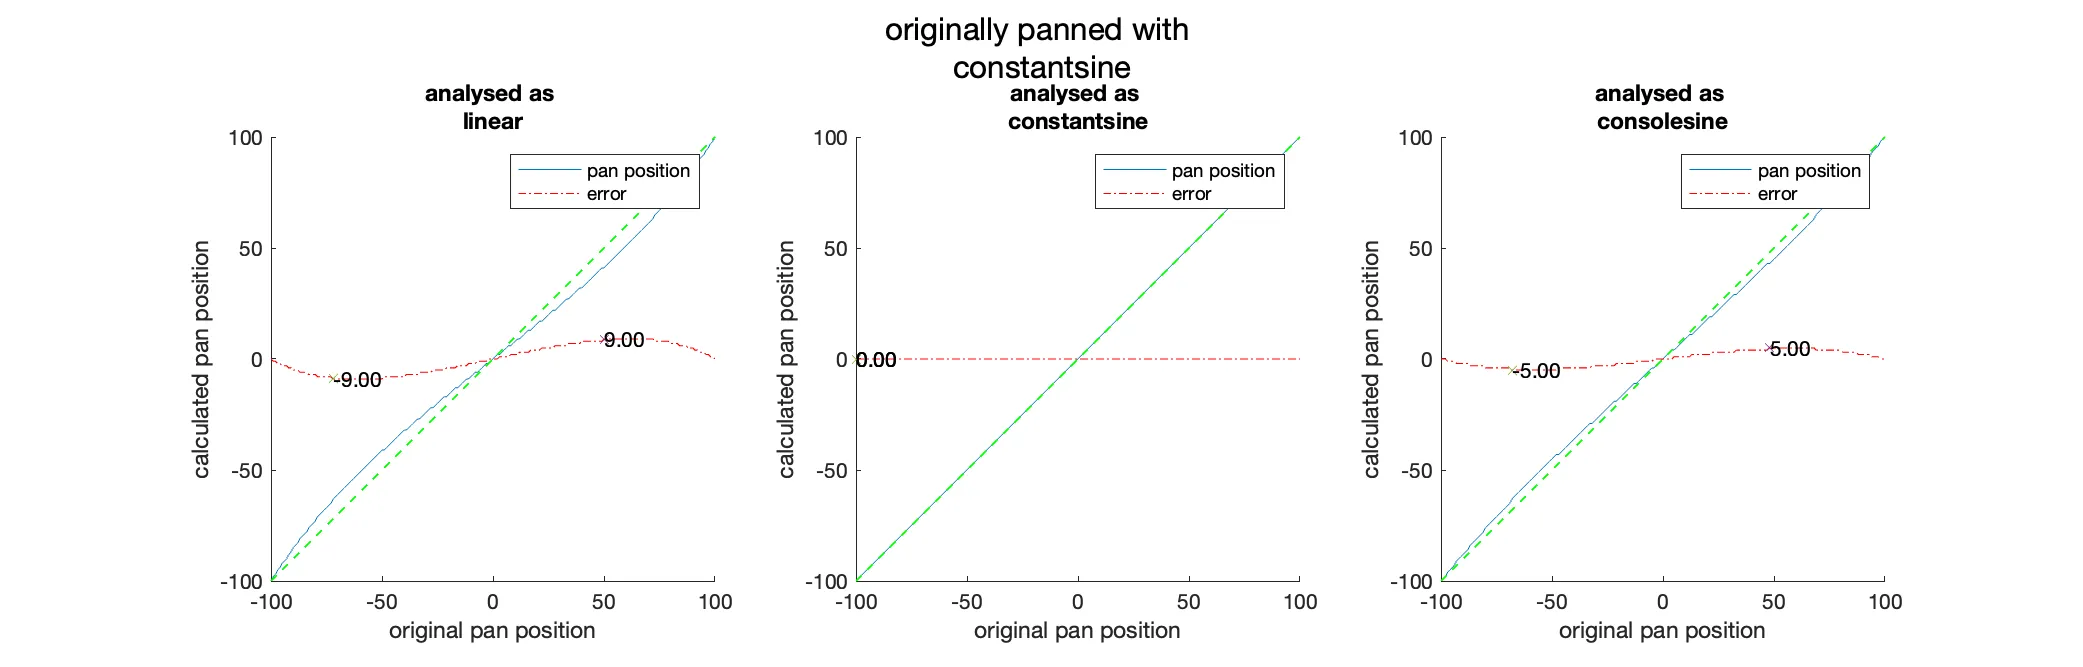
As we can see in the “Analysis of the discrepancies between the pan position of the input signal and the pan position calculated from the analysis with constant power panning as the source.” figure, there is, as expected, no difference between the analysed and the original pan position when we use the same panning function. When we use a different panning function for the analysis than the original panning, we can see that there will be errors due to the slightly different level ratios of the left and right channels. These errors are the most pronounced at degrees with a maximum error of which happens at the exchange between linear and constant power panning (see the figure below). In all other cases, the error is on average at .
Since most of the time, the original panning function and the one we use for analysis will be constant power, these errors are negligible.
Pan Depth Compensation with Reverse Panning
The simplest and most common approach to converting a stereo file to mono is to add the two channels together, yet this leads to an increased gain which can be problematic. To avoid this, we can apply a defined gain to the summed channels. This gain is usually set to the maximum increase in gain that can occur at the centre pan. So the final function for converting a signal to mono would be the following:
where is the sum of the left and right channels and is the amplitude scalar calculated by the peak that occurs at the centre pan.
As we can see in the “Plots showing the left and right channel with their summed and compensated amplitude when only using a predefined scalar for each panning function.” figure, the amplitude of the sum of the two channels is, except for centre pan and linear panning, never that of the original signal.
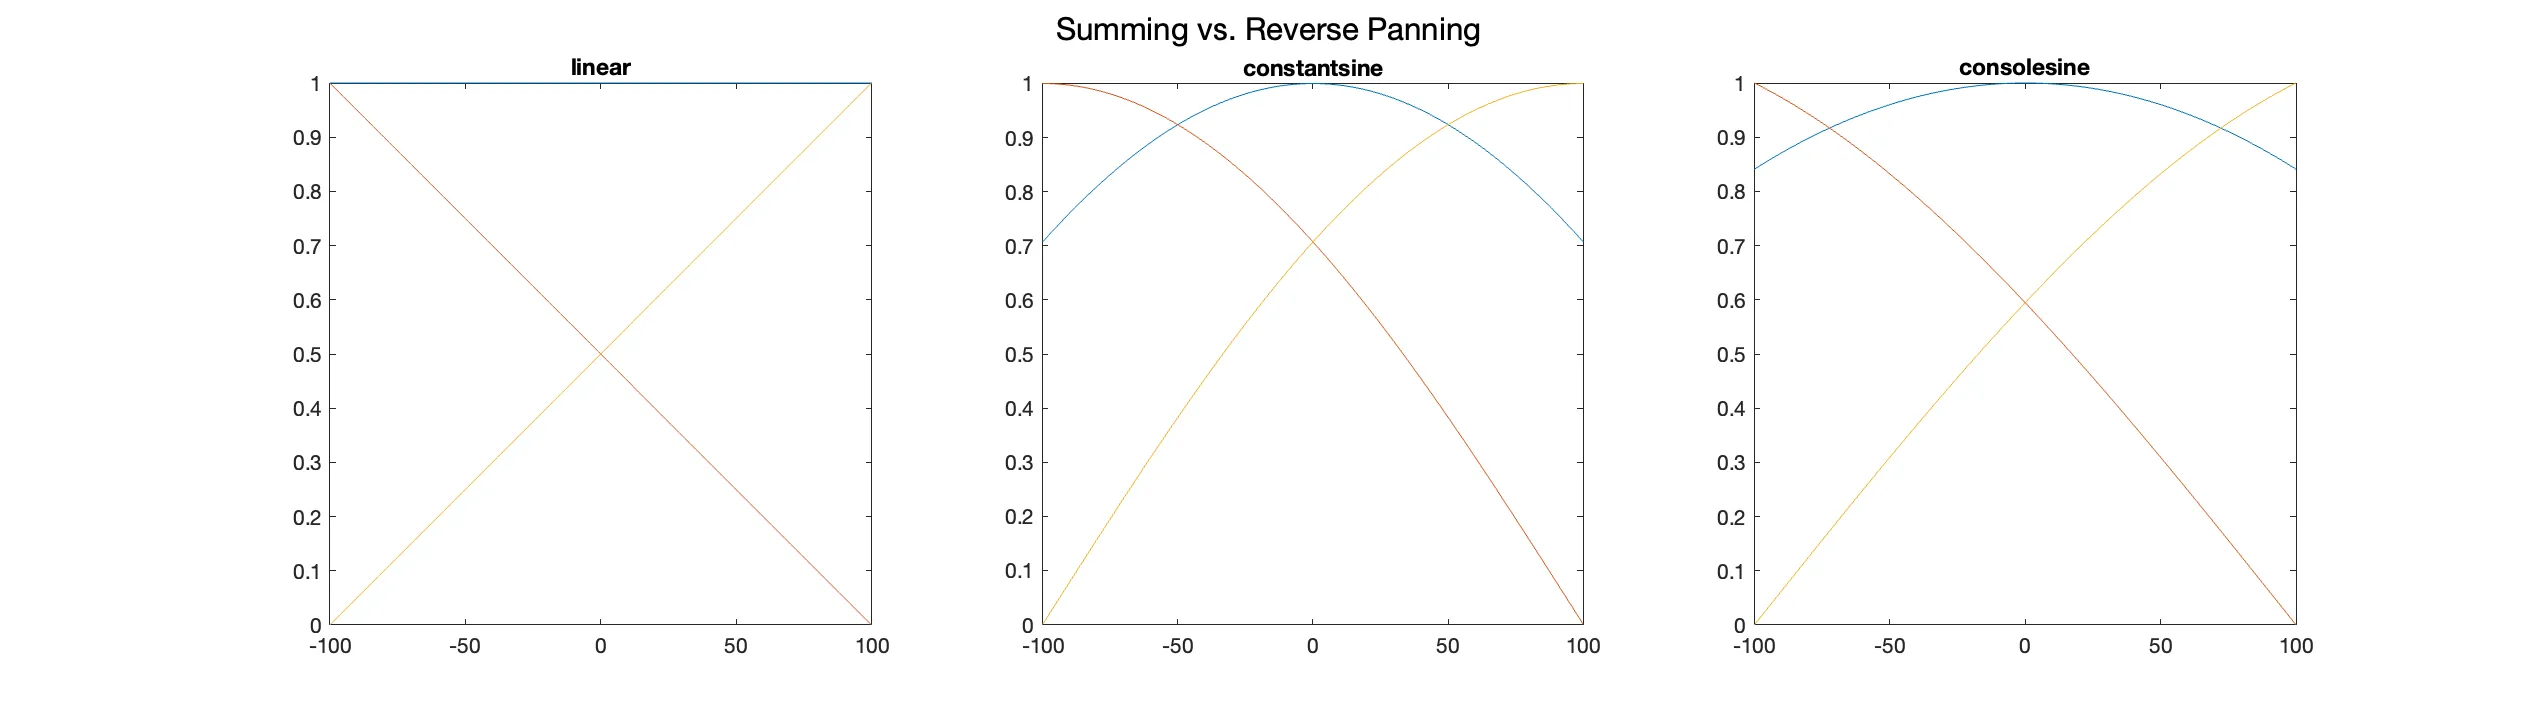
To avoid this problem, we can use our knowledge of the original pan position we calculated earlier during the analysis to compensate for the increased gain. By calculating the amplitude scalars of each channel at the pan position from the analysis, we can compute the gain that would be needed to compensate for the increased gain and then apply it to the loudest channel.
where and are the amplitude scalars for the left and right channels determined by the selected panning function and pan position. This approach allows us to output a mono signal with the same loudness as the original signal.
Rule Based Batch Renaming
Batch renaming is one of the most central features of Lippo and needs to be implemented in an easy-to-use yet extensive and powerful way. Furthermore, the underlying implementation needs to be built such that adding new rules in the future is achievable without having to change large sections of the code.
For this, we can structure the code such that we have an abstract class defining the core functionality and interface of a renaming rule while then implementing the concrete rules in various subclasses. This approach allows us to store an array of these abstract classes over which we can iterate and apply the rules in order. Adding new types of rules is only a matter of implementing a new subclass.
Most of the rules, Replace, Add and Trim, are only executing basic string operations such as replacement and addition. However, the LKRepeatingPatternAnalyser rule is a more complex rule that deploys a basic search algorithm to find repeating patterns across all the input files provided by the user.
Furthermore, the LKRegExEcuter rule is a rule that is designed to execute a set of multiple RegExes over all files. This rule needs its own system of holding and executing rules and storing them in presets. This complex system for implementing RegEx was chosen, as it allows complex sets of string operations from a single dedicated interface hidden behind a single menu from the base UI. This approach allows knowledgeable users to create any operation they can imagine while hiding the complexity from the average user. As a bonus, it allows us to provide a set of premade presets for complex operations in a single interface.
Additionally, we need some safeguards to prevent files with duplicate or empty names. The latter can quickly occur when importing a set of multi-tracks exported, for example, by Ableton Live. There, all the single multi-tracks are exported individually with a name of the form <project name> <track name>, as well as an export of the master bus with the same name as the project.
When using the LKRepeatingPatternAnalyser to remove all repeating patterns, it will remove the project name from all the files, including the master track, leading to a file with an empty name. To avoid this issue, we can detect this and prevent the rule from changing the name of the master track, so it then remains unchanged.
To prevent the renaming engine from creating duplicate names, we can check if there are files with duplicate names on every execution of all the rules and number them incrementally.
Since the sets of renaming rules the user is able to create can become reasonably complex, the need arises for a simple and intuitive way to store and load these rules with a lightweight preset system.
For this to work, we need to find some way of storing the rules on the user’s machine so they can be listed and loaded later. An encoding that comes to mind is JSON. It “is a text format for the serialisation of structured data [… and] can represent four primitive types (strings, numbers, booleans, and null) and two structured types (objects and arrays)” (Bray, 2017). Additionally, through the use of the Codable protocol, JSON can be easily encoded and decoded into Swift objects. This makes it a perfect fit for our needs since we can store the rules in a structured array of raw data and then use the Codable protocol to encode and decode the data.
To connect these two elements, the preset and the rules, we need to define an interface to manage and control the individual rules and load and save them to a file. The RenamingPresetDelegate is the class which handles all these tasks and holds a reference to the preset that is currently loaded, as well as a separate list of all the rules that are currently loaded (see the figure below). This doubled storage is necessary to allow the user to add and remove rules from the preset without having to reload and save the entire preset. It also allows us at a later time to compute the differences between the two to determine if the preset has been changed.
Comparison of Various SRC Algorithms and Choosing One
In digital audio, a signal is represented as a continuous stream of samples, each taken at a specific interval. The interval is called the sampling rate (Brixen, 2020). When working with audio, we sometimes have to deal with different sampling rates and hence need a way of converting between them. There are several different algorithms for performing SRC, and they all have their own advantages and disadvantages.
The algorithm we will choose in the end has to be the one that is most suitable for our use case and can be easily integrated into the application. Since Lippo is an offline audio processing tool with no real-time requirements, we can favour precision over speed while still being mindful of performance.
To compare the precision of the different algorithms, we will use test results obtained by the mastering engineer David Horrok (Horrock, 2022). These results were created by converting a predefined set of test files from 96kHz to 44.1kHz using the selected algorithm. The resulting file is then visualised with a spectrum analyser.
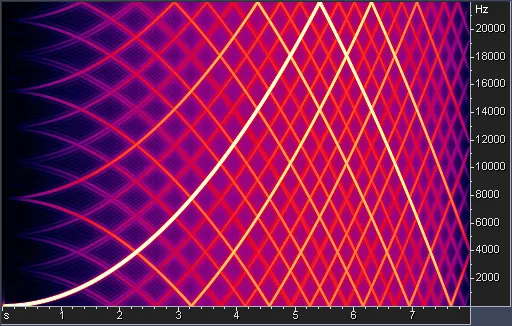
The first one we will consider is the implementation of the SRC algorithm in JUCE (see the figure below) since we are already working with this library for other analysis and processing tasks. Internally it uses Lagrange Interpolation to perform the conversion (JUCE, 2022). While this algorithm would be easy to implement, it generates too much noise and unwanted signals.

Another popular library for SRC is libsamplerate (see the figure below), which is a library that contains implementations of several different SRC algorithms which are sorted by quality. It was created by Erik de Castro Lopo and is published under the two-clause BSD license. (de Castro Lopo, 2022)
For this comparison, we use the highest quality version provided by the library. Compared to the JUCE implementation, this algorithm is more accurate. It has better quality, yet we can still detect some of the artefacts at a very low amplitude on closer inspection. However, these artefacts are too small to be noticeable by the human ear.

The last algorithm we will consider is r8brain (see the figure below). It was developed by Aleksey Vaneev of Voxengo and published under the MIT license.
Under the hood, this algorithm first produces two times oversampled signal which then is interpolated “using a bank of short … polynomial-interpolated sinc function-based fractional delay filters.” (Vaneev, 2022)
When looking closely at the test results in the figure below, we can see that the algorithm produces even fewer artefacts than the libsamplerate library. Additionally, it comes with an easy-to-integrate C++ API that allows us to use the algorithm in our application.
After thoughtful consideration, we can see that the r8brain SRC algorithm is the best choice for our use case. While still performant, even under the added constraint of converting the signal to double precision, the r8brain algorithm allows for the most accuracy, meaning the least amount of added artefacts.
Implementing and Verifying R8brain’s SRC Conversion Algorithm
After choosing the r8brain SRC algorithm, we have to implement it into our existing application processes and verify that it works as expected. We will use the API provided by the library to communicate our preprocessed audio data to the algorithm. Yet first we have to find a place in the final process() function where we can insert the SRC converter.
Until now, all our process function does is convert the original audio data to mono if desired and apply our calculated gain to arrive at the desired output target level. An excellent place to insert the SRC algorithm is between these two steps since we only convert as many audio channels as necessary while still assuring that the output is at the desired level.
Furthermore, r8brain requires that the input and output buffers are double-precision floating-point arrays. Therefore, we must convert our input and output buffers to this format before passing them to the algorithm; however, we are only working with single-precision floating points. This is still less computationally expensive than rewriting the entire application such that all buffers are double precision floating point arrays. Hence we arrive at the sequence of steps we can see in the figure below.
After successfully implementing the SRC algorithm, we can verify that it works as expected by comparing converted files with the expected signals. To do this, we use Matlab’s built-in sweeptone function (The MathWorks, 2021), which allows us to generate the same test signal at different sampling rates. We can then use this generated test signal, put it through Lippo and compare the result with a newly generated test signal at the same sampling rate we converted to.
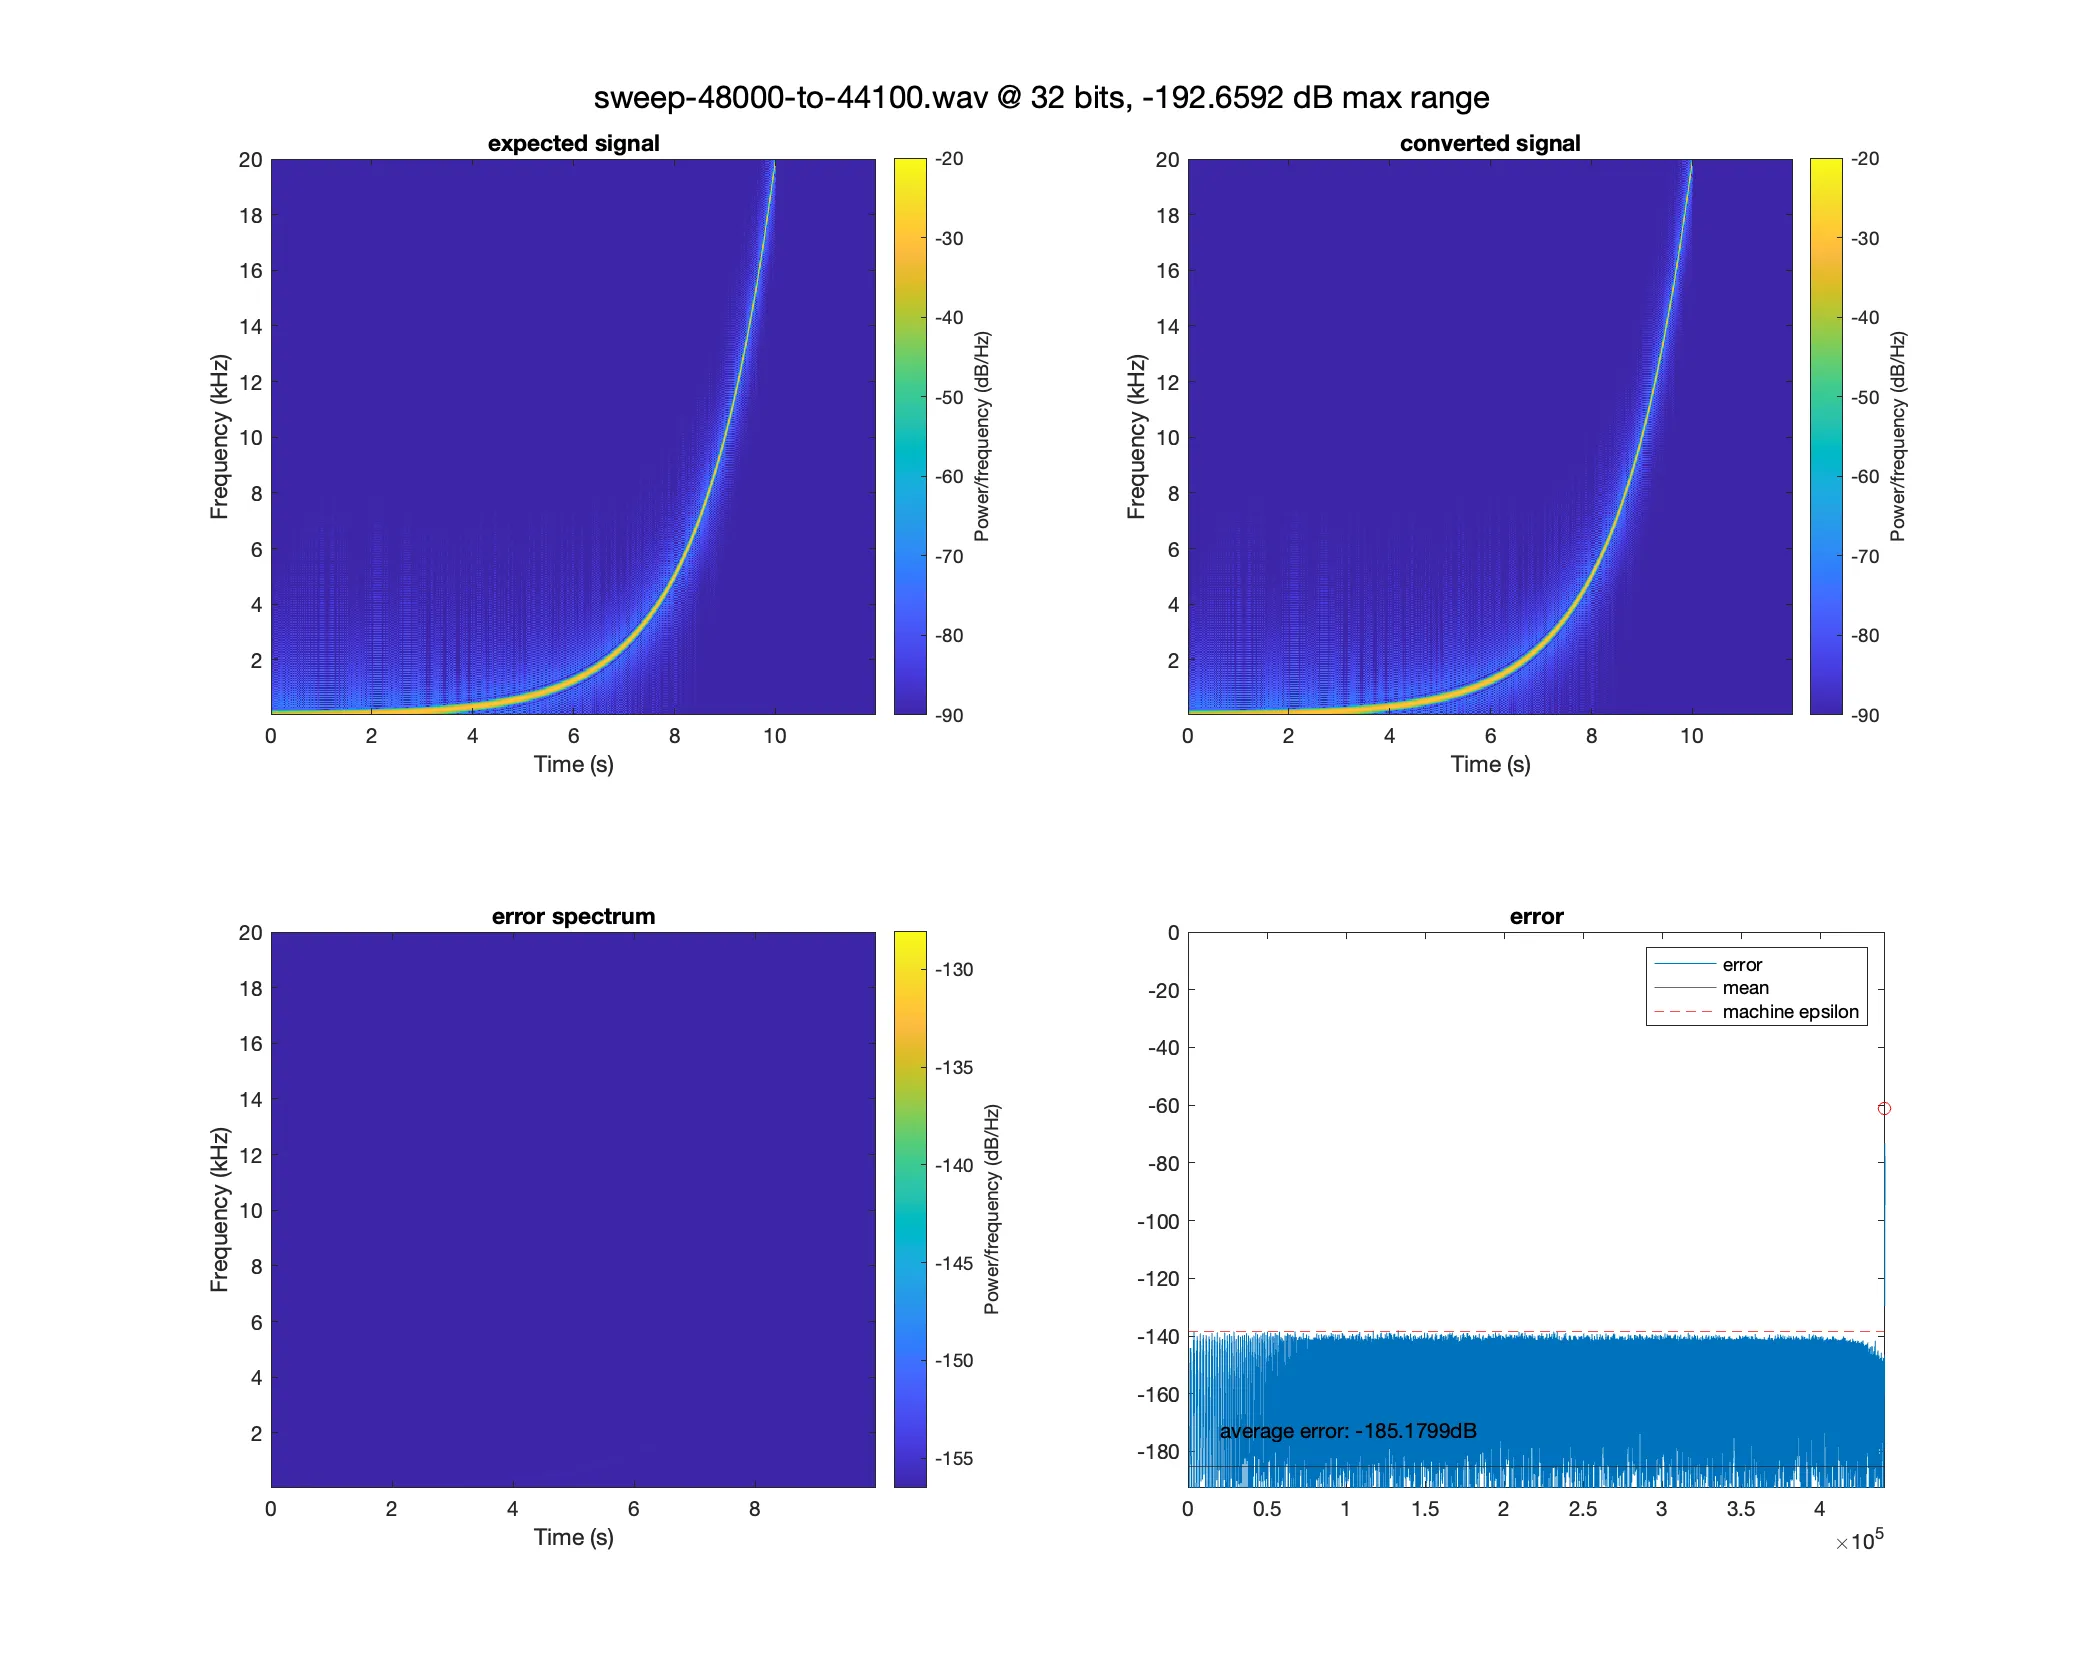
As we can see in the “Analysis of a 48kHz signal being converted to a 44.1kHz signal.” figure when comparing the expected to the converted signal, there are no visually striking artefacts as seen in the figure below with the JUCE SRC algorithm. Even in the error spectrum, which we create by subtracting the expected from the converted signal, we still cannot see any artefacts, such as reflections of the signal. Only after a closer look at the amplitude distribution of the signal can we see that there is a noise floor, yet this noise floor is below which is near the machine epsilon of single precision floating point numbers determined through C++ stdlib functions (cppreference, 2022).
float epsilon_float = std::numeric_limits<float>::epsilon();
After arriving at similar results with any combination of available SRC conversion pairs, we can conclude that the r8brain implementation within Lippo is working as expected.
Target Based Level Adjustment
As described in the “Stereo Image Analysis and Reverse Panning” section, when converting a stereo signal to mono, we aim to gain the signal to the original level of the file before it was panned. This is calculated by a pan position-dependent gain factor. While this is just a simple amplitude operation, it opens up several possible difficulties that may arise; primarily, it can lead to clipping.
To design a system that is able to detect these potential overloads while also ensuring that the final amplitude is at the desired level, we need to approach the gain staging backwards.
Instead of applying each gain factor after the other to the signal and “hope for the best”, we can precalculate the potential change to the maximum sample peak of the signal. This is done by applying all the gain stages after another to the maximum. We then can inspect that amplitude and determine if it exceeds a defined maximum.
The user can change the maximum allowed level for all output files in the settings. If the expected level of a file exceeds this maximum level, the system will automatically reduce the gain factor to the maximum level by normalising the signal to that level. This last portion of the gain stage in Lippo is called Overload Protection.
All these stages are still happening within LippoKit on a higher level by only observing the sample peak. Here we calculate a target level for each file where we apply these various rules. In the final processing, our exporter only computes the difference in gain between the buffer and the target level and gains it accordingly. This approach ensures that the final files are always at the desired level and automatically corrects minor internal errors such as level changes due to the SRC.
Furthermore, this approach is easily extensible and can, in a later version of the product, be expanded to a more full-featured rule-based gain staging system similar to the renaming engine.
Final Thoughts
As a result of this thesis, we now have a working MVP of Lippo, a software with the stated goal of helping audio engineers be more productive when importing and organizing large sets of files. The software is currently in a state where it can be used by a broader audience after most of the initial bugs have been fixed while all of the functionality planned for the initial release has been implemented.
The next steps for Lippo are getting more feedback from the community and implementing the features missing from the current release by broadening the number of beta testers. However, this step requires some form of marketing and advertising, which was not the focus of this thesis. The initial plan was to create a website and a social media presence and send out emails to university students, yet these led to no results. So the primary focus for the next months is to develop and formulate a marketing strategy for Lippo to attract more users and get more feedback; this also includes emails to audio engineers, music producers, and popular online magazines.
To sum up, this project was a great learning experience in designing and implementing audio software from scratch with all the challenges that come with it, such as automated testing and deployment. For the next project, the main takeaway is to focus on user feedback and marketing from an earlier stage to better prioritize and engage future users in the development process.
Detailed Test Results
The following are the test results of all panning functions against each other with the resulting errors after each operation. For details on how the tests were conducted, see the “Verifying the Algorithm and Calculating Error Margins” section.